AT8RC COLLIMATION
It's easy to tell when a Ritchy-Chretien scope is out of collimation. The tell-tale sign is oblong stars at one side of the image while the other side looks better. You may also notice a slight coma-flare on stars, most noticeable at the center of the image.
But collimating an Astro-Tech Ritchy-Chretien scope can be a daunting experience for the following reasons:
- The collimation intructions in the manual are not good for imaging and can actually make things worse.
- The same goes when attempting to use the standard way of collimating a reflector or SCT.
- There is a lot of misleading info on the internet (nawh!)
- The adjustments are not intuitive.
Secondary Mirror:
- Adjusting the secondary mirror mainly affects the oblong stars at the edge of the image.
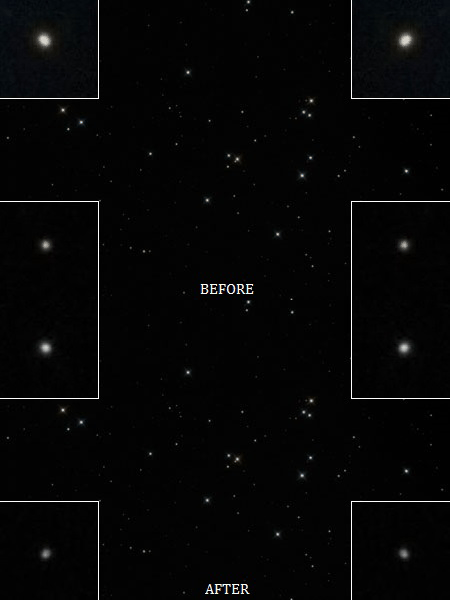
- Tightening a secondary mirror screw (and loosening the other 2 screws) reduces star elongation of the corresponding edge.
- This is best seen by viewing an in-focus image of at least 1 minute exposure time.
- Adjusting the primary mirror mainly affects the coma of stars in the image.
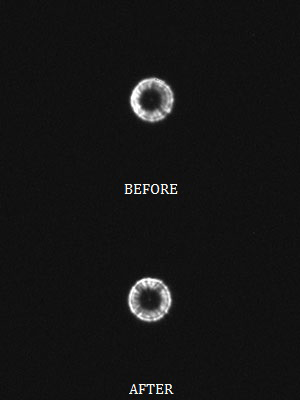
- When de-focussed OUTWARD, loosening a primary mirror black-screw (and tightening its mating silver-screw) reduces the coma flare or "fat" of the corresponding side of the star-donut. This also reduces the brightness of the other side of the donut.
- This is best seen by viewing a slightly out of focus star-donut at the center of the image.
Preparation:
- First try using a proven field-flattener such as the Astro-Tech ATFF2 or the Astro-Physics CCDT67. The results may be so good you'll forget all about collimating!
- Aim the scope toward a suitable field of stars such as a large bright open cluster.
- Attach the camera and guiding setup.
- If you use a field-flattener or focal reducer, it's important to attach it as well because they seem to shift the field curvature as well as flatten it, hence requiring different adjustments.
- Rotate the camera so that the top of the image corresponds with the top of the scope. For DSLRs, the top of the camera should be aligned with the bottom of the scope. For most CCDs, the top should be aligned 90 deg to the right. (CCD cameras are designed this way so that Dec movements correspond to up/down on the image.)
- Confirm the rotation by de-focussing OUTWARD, taking an image with your hand in front of the top part of the scope, and looking for a gap on the top part of the star-donuts.
Warning1: If you de-focus inward, the donut gap will be on the bottom (opposite of where you placed your hand).
Warning2: Failure to confirm the rotation may result in adjusting the wrong screw!
Primary Mirror Collimation:Warning2: Failure to confirm the rotation may result in adjusting the wrong screw!
- Using the focus mode of your software, de-focus OUTWARD slightly so that the stars are very tiny donuts.
- Select a star near the center of the image, and determine which side has flare or is fatter. The other side will be brighter which is sometimes easier to see.
- Loosen the primary black-screw that corresponds to the flare by no more than 1/16 of a turn, and tighten its mating silver-screw.
- Repeat steps 1-3 until the star-donut is balanced.
- Focus the scope, switch on guiding, and take a 1 minute image.
- Examine the corner stars and choose the corner with the most oblong stars (stars stretched toward and away from the center of the image). If you are using a field-flattener, this may require some careful examination to determine the worst corner.
- Tighten the corresponding secondary screw by no more than 1/16 of a turn, and loosen the other screws by the same amount.
- Repeat steps 1-3 until each corner is balanced with its opposite corner. Don't be surprised if one set of opposite corners has more elongation than the other set. This is normal for a Ritchy-Chretien.
Note1: If at any time the stars look like triangles, the secondary mirror is pinched. Loosening all 3 screws will fix it.
Note2: If you are not using a field-flattener, you may notice the secondary adjustment causes the center stars to become slightly oblong. Back off the adjustment a bit to reach a happy compromise.
Note2: If you are not using a field-flattener, you may notice the secondary adjustment causes the center stars to become slightly oblong. Back off the adjustment a bit to reach a happy compromise.
After collimation is complete, and assuming you have one of the above mentioned field-flatteners, you should have well shaped stars across the entire image.
Example Images:

Primary Collimation: The right side of the donut is flared and the left is brighter. Loosen the right-hand black-screw and tighten its mating silver-screw.

Secondary Collimation: The stars at the top are the most elongated. Tighten the top screw and loosen the other 2 screws.
The good folks at Deep Sky Instruments offer a similar collimation procedure and some great info on Ritchy-Chretiens. The main difference between our methods is that I found it is easier to see oblong edge-stars on an image that is in-focus, rather than out-of-focus:
Another Astro-Tech RC user with a similar method, and great images: